Showing posts with label food. Show all posts

Tuesday, 19 August 2014

Fresh Mint Stracciatella Ice Cream with Chocolate Leaves - Without an Ice Cream Machine!

I've added a fourth meal to my days: ice cream. Yes, ice cream as a meal. Can be eaten at any time, though usually between lunch and dinner, or after dinner. Or both.

The days are so hot now that I feel like air-conditioning or going to the pool or wearing nothing wearing less is just not doing anything to cool me down. Ice cream, though, seems to do the trick. ;)

Fresh mint leaves | Svelte Salivations

So when our neighbour kindly gave us some home-grown fresh mint leaves, I decided to make some fresh mint ice cream, with dark chocolate strewn throughout!

Only, I don't have an ice cream machine! I've been longing for one for ages, but it's not an investment I'm able to make currently, so I read up on ice cream making without a machine. And as with everything, there's loads of advice out there on the internet about how to go about doing so! This post from The Kitchn summarises much of the information out there.

Fresh Mint Stracciatella Ice Cream with chocolate leaves | Svelte Salivations

I think the mint leaves I have here a spearmint leaves. They smelt amazing and were so herby and fresh, so unlike the artificial in-your-face mint flavour that gum / toothpaste / cheap ice cream has. 

To get the most out of the flavour, I blitzed them up with some milk in a blender until the pieces were extremely fine. This turned the milk a funny yellow green colour at first, but then when I heated it up with the rest of the milk and cream, the colour developed into a beautiful pastel mint! Natural food colouring! I then let it sit in the hot milk/cream mixture until cooled - a bit like steeping tea, trying to slowly and delicately draw the flavour out. 

Fresh Mint Stracciatella Ice Cream with chocolate leaves | Svelte Salivations

I chose this method found on The Kitchn to make my ice cream, with a bit of modification to suit my needs. It's instructions on how to freeze and churn the ice cream, rather than the ice cream mixture itself. The method basically involves using an electric mixer to smash out any ice crystals that form between bouts in the freezer, and also 'churning' the mix while freezing (as the mixture bowl is nestled in ice).

The results were not bad - my ice cream didn't turn out creamy and smooth, but it was definitely scoopable and not a solid block of ice! Though part of this may be to do with my choice of a lower-fat recipe, I think this method of making ice cream without a machine may not be suitable for a hot place like Hong Kong. 

As soon as I took the ice cream mixture out of the freezer to mix and churn, it started to melt again, even though I made a nice ice bath for it! It was like one step forward, two steps back... I struggled to get it to a soft serve consistency, and then when I did, it melted into liquid again as soon the electric mixer hit it!

Fresh Mint Stracciatella Ice Cream with chocolate leaves | Svelte Salivations

The resultant consistency was a compromise between ice cream and sorbet. There ice crystals in it, but only very fine crystals that actually contribute to the unbelievably cool minty freshness that this ice cream is. 

Fresh Mint Stracciatella Ice Cream with chocolate leaves | Svelte Salivations

I drizzled melted chocolate during the last churning to make stracciatella, because nothing goes better with mint than dark bittersweet chocolate

Then with the last bits of leftover melted chocolate, I painted over the back of some mint leaves to make intricate chocolate leaves. Decoration that's edible, is the best type of decoration!

Fresh Mint Stracciatella Ice Cream with chocolate leaves | Svelte Salivations

Try out this fresh minty ice cream to cool you down this summer, and let me know what you think. It's definitely worth the effort. Alternatively, you could chuck a bucket of ice over your head (#ALSIceBucketChallenge, anyone?)!

Full recipe -->

Monday, 18 August 2014

Islam Food 清真牛肉館

Have you heard of Chinese Islam food before? I certainly hadn't before trying this place out! For some reason, my first thoughts of what to expect were along the lines of sweet and sour falafels, kebab meat wrapped in Peking duck pancakes, or maybe... Yeung Chow fried couscous?

The restaurant, simply called Islam Food (the Chinese name 清真牛肉館 is a lil more descriptive - Halal beef restaurant), has been around since 1950, and essentially sells Chinese food with Halal meat. So, no, none of my imaginative concoctions were cooked up.

A lot of the food is done in Northern Chinese style - think Shanghai food with their xiao long baos, noodles, rice cakes etc, but there are also Pakistani-style curries and sweet and sour dishes (Cantonese food). 

There's more on their story here at www.islamfood.com.hk.

Veal Goulash at Islam Food, Hong Kong | Svelte Salivations

Veal Goulash is probably their most famous dish. It's a juicy beef burger patty, enclosed by a layer of dough that is somewhere between naan bread or pitta bread, and dumpling wrapper pastry, which is then fried until crispy! 

As tempting as it looks, do not pick it up and take a massive bite as soon as the waiter sets it down on the table! The scalding hot beef juices WILL burn your tongue and your taste buds will no longer be in top form to taste the rest of the dishes to come. So be careful, and daintily bite into this beefy delicacy only when its cooled a little. You have been warned!

Veal Goulash at Islam Food, Hong Kong | Svelte Salivations

Here at Islam Food, they have a extra high ratio of beef and lamb foods. This may be to compensate for the lack of pork dishes? Whatever the reason, I'm not complaining! Lamb, and then beef are definitely my favourite types of meat, so the menu suits me well.

Lamb Jello at Islam Food, Hong Kong | Svelte Salivations

This cold dish is Lamb Jello. It is some lamb chunks sitting in 'jelly'. I'm not sure what exactly the jelly is, but probably consists of lamb juices and gelatine cooked from bones/cartilage that means that it sets when cool enough. As soon as it enters the warmth of your mouth though, it melts into a lovely aroma that is surprisingly not oily.

Beef dumplings at Islam Food, Hong Kong | Svelte Salivations

Beef dumplings in soup. I liked how these are round in shape, and they contain yummy juicy beef inside! Again, hot liquid is encased in these little bite-size parcels!

Lamb noodles at Islam Food, Hong Kong | Svelte Salivations

Lamb noodles! A lot of the food here can be done with different kinds of meat, so if lamb is not your thing, choose beef. Easy!

Lamb noodles at Islam Food, Hong Kong | Svelte Salivations

These noodles are delicious! Okay, so maybe the noodles themselves are a lil overcooked, but the lamb broth is sooooo good! It's rich and has that lovely lamby-ness that lamb lovers love.

Lamb jiazo at Islam Food, Hong Kong | Svelte Salivations

Okay, so maybe I should mention that this post centres heavily around lamb... If you haven't noticed =P

These are lamb jiaozi 餃子, which are dumplings that have been pan-fried. The filling is bursting with goodness, but the pastry is a little doughy... I prefer the lamb xiaolongbao 小籠包 which tastes amazing and is steamed instead (no photo unfortunately!)

Curry Mutton with vermicelli at Islam Food, Hong Kong | Svelte Salivations

Their curries are another thing to try! They are done in Pakistani style and are the soupy type (as opposed to thick saucy type). I found it to be hot and spicy, so it's definitely got a kick to it! 

Spring rolls at Islam Food, Hong Kong | Svelte Salivations

Spring rolls! These are crispy crispy crispy, and brilliantly light. 

Spring rolls at Islam Food, Hong Kong | Svelte Salivations

And a final lamb dish to rave about: Boneless lamb chops which have been deep fried. They are served with a bowl of rich and concentrated lamb soup for dipping. The meat is tender, though not for the faint-hearted, as its a fatty cut - that's probably why it tastes so good!

Boneless lamb chops at Islam Food, Hong Kong | Svelte Salivations

Final thing to mention about Islam Food is that there are two branches. Both are in Kowloon City, and the branch shop is just a street or two down from the main shop. A lot of people insist on going to the 'original' but really, its the branch shop you want to go to!

Not only is the branch shop bigger, more spacious and cleaner (at least it feels that way), but their menu is also more extensive! Some dishes are only available at this second store, oddly enough, not the other way around. And, less people know about this store (or choose not to go), so there's less chance you'll have to queue for ages. Win-win!

Islam Food // 清真牛肉館
總店: 九龍城龍崗道1號地下 // Main Branch: 1 Lung Kong Road, Kowloon City
分店: 九龍城打鼓嶺道33-35號地下 // Second Branch: 33-35 Tak Ku Ling Road, Kowloon City

More info on their website
About HK$50-$100 per person

Thursday, 24 July 2014

Watermelon and Mango Ice Blocks


How hot does it get in summer where you live? It's been hovering around 32˚C in Hong Kong these few weeks and the humidity only makes it seem hotter.

Ice cream and ice cold drinks are staples of the summer diet, but it's hard to enjoy these treats while maintaining that summer bod you've worked so hard for!


These ice blocks are delicious and healthy, perfect for these hot summer days. All you need is some fresh fruit, which should be abundance at this time of the year! Watermelon and mango is actually a combination I've fallen in love with after trying this flavour combination in a drink.


The watermelon is refreshingly crisp, while the mango is sweet and fragrant. I used Thai mangoes for this, which are yellow and shaped like a leaf. I prefer the mangoness of these compared to the greeny-red round ones. I also added some lime juice to the mangoes just to cut through the richness a little.


Try out these delicious fruity treats and let me know what you think!

Full recipe here --->

Wednesday, 7 May 2014

Soft Salted Pretzels

I had a massive pretzel craving the other day. I really wanted a big, soft, crunchy, dense, crispy, salty, chewy pretzel. And I had no idea where to get one in Hong Kong. (Please let me know if you do!)

Soft pretzels with fleur de sel | Svelte Salivations

So I had to make my own to satisfy my desires

I'd vaguely remembered the process of making pretzels, as it had been the final technical challenge of the Great British Bake Off last year. There was an unusual step of boiling the dough in some baking soda water before baking it.

Soft pretzels with fleur de sel | Svelte Salivations

A quick youtube search, which involved watching some very lovely, and very entertaining German-speaking bakers, confirmed that this boiling step was indeed necessary. However, my lack of understanding of German meant that I couldn't gather a recipe.

So in the end, I chose to base my recipe on this one on BBC Good Food: "Authentic German Pretzels".

It's a recipe that requires a little more time and preparation. But, these pretzels taste as good as they look, and are worth every oomph of effort

Soft pretzels with fleur de sel | Svelte Salivations

You need to prepare a sponge first. What's that? Well, it's just a mixture of some of the flour and water and all of the yeast used in a recipe, which is then left to ferment. The purpose of this is do develop the taste of the pretzels. It's a similar idea to sourdough starters! I left mine overnight, but most people say 5 hours is enough if you're in a hurry!

Then add in the the rest of the ingredients and mix and knead well. You can cheat here if you've got a bread maker or dough hook on a stand mixer that will do the mixing! The dough is quite a dry dough, and once it's all mixed together and incorporated nicely, it shouldn't stick to your hands and you won't need any extra flour to dust your work surface. Shape it into a nice big ball, pop it in a bowl, cover and leave to rise. 

It's ready when the dough bounces back completely but gently after you push a finger into it. Give a a good couple of punches to knock out some air then divide it into 12 even portions.

Pretzel dough balls | Svelte Salivations

Shape each portion into smooth round balls first. Keep all the dough (apart from the piece you are handling, of course!) covered lightly with some cling film. Then roll out each ball into a thick log. 

Doing the shaping step by step from big dough ball -> small dough balls -> thick short logs -> before finally making a long rope of dough makes it easier to stretch the dough. The dough has some time to rest and adjust to its new shape before it has to stretch again. Otherwise, you might find the dough being uncooperative, and creeping back to the centre after you've rolled it out.

Pretzel dough logs | Svelte Salivations

Once you've got all your thick pretzel dough logs, then you can start to roll out long ropes to create a traditional pretzel knot. Pretzels are usually thicker in the middle, so leave the 10cm in the centre, and use both hands to gently roll and stretch the ends out. Apply a gentle pressure from the inside to the outside, and spread the dough out until it's 40-50cm long.

Pretzel dough rope for pretzel knots | Svelte Salivations

Ideally, it should be fatter in the middle and taper out towards both ends. 

Now for pretzel knot tying!

The videos I saw on youtube tie the pretzel knots the traditional (I assume) and quick way. It looks easier than it is, but it's fun and I think that you should definitely watch videos like these, and try it yourself!
  1. Hold up the pretzel rope by its ends, one in each hand, so that it forms a 'U' shape.
  2. Keeping both hands in the same place (i.e. don't cross them over each other), flick the rope and swing the bottom of the 'U' shape, so that it twists and crosses over on itself, forming a double twist.
  3. Quickly, before the double twist untwists, lay it down on your work surface, without letting go of the ends.
  4. Lift the ends and fold the knot back up on the pretzel and press down firmly to secure the ends.
Remember, practice makes perfect!

If it's not happening though, don't worry, there's a backup plan!

Pretzel knot tying | Svelte Salivations

Step 1: Place rope in an upside down 'U' shape, lift both ends, and cross your right hand over your left, and your left under your right, so that the ends have switched places.

Pretzel knot tying | Svelte Salivations

Step 2: Lift both ends again and cross your right over your left, left under right, again, so you get a double twist.

Pretzel knot tying | Svelte Salivations

Step 3: Lift both ends and flip the knot back onto the pretzel. Press the ends in to secure.

Pretzel knot tying | Svelte Salivations

Repeat with all the pretzel dough logs. Then leave all the pretzel knots out, uncovered, to rise again and form a crust while you make the baking soda solution. 

The baking soda solution, is just baking soda (bicarbonate of soda), dissolved in some water. I would use cold water, and bring it to the boil, because the heat makes the baking soda really fizz, so it's easier to control and less dangerous if you don't take a shortcut.

Apparently, they use lye in a commercial setting, which is caustic soda (NaOH - sodium hydroxide). It's really not something you want to be using at home (unless you're unblocking sinks and drains!), and baking soda is much more friendly and will do the trick.

When the solution is boiling, dip in the pretzels for 5 seconds, then flip and do 5 seconds on the other side. I did mine one at a time, because 5 seconds really is a quick 'dip' and I wouldn't have been able to manage any more. 

Fleur de sel for pretzels | Svelte Salivations

I wanted simple salted pretzels, so I just had some fleur de sel ready to sprinkle onto my boiled, wet pretzel knots. Coarse, unrefined salt works best for sprinkling on top because it doesn't dissolve. And try to remember to sprinkle while it's wet, so it sticks on better!

Pretzel knots, boiled, salted and ready to bake | Svelte Salivations

Now I didn't slash my pretzels. Some people do, because they find that this controls the pretzels rise in the oven, and the way the pretzel crust splits. You will get a nice, even, clean split if you deeply slash the pretzel at the thickest part. However, I don't think it's necessary, and if you don't, you'll just get raggedy but unique, 'rustic' splits in the pretzel crusts.

The pretzels can then be baked! They need to go into a hot oven until they are a nice brown. Pretzels have to be a nice deep brown colour. Not golden! Deep brown. It's the colour that gives it it's taste. 

Soft Salted Pretzels | Svelte Salivations

I think they're best fresh out of the oven, still warm, but cooled enough so that the crust becomes just crispy. When you break it, there's a satisfying crunch to it, and yet the crumb inside is soft, warm and tight. 

Soft Salted Pretzels | Svelte Salivations

They're a bit of work, but oh-so-worth-it!

Full recipe ->

Tuesday, 25 March 2014

Vegetarian Kimchi Rice Burger

Vegetarian Kimchi Rice Burger | Svelte Salivations

The Guardian recently wrote an article titled Crisis in Korea as younger generation abandons kimchi. It's certainly a shocking title, and I panicked internally that there would be no more kimchi anymore. To my relief though, the abandonment refers to the fact that today's generation of Koreans are (unknowingly or not?) consuming kimchi that is imported from China, rather than authentic local Korean-made kimchi.

Interestingly, the article claims that most Koreans are none the wiser that the kimchi they are being sold and served is often Chinese (due to it being cheaper). That's good news to me because, having never been to Korea and eaten kimchi made by a true Korean, there would be no way for my taste buds to know the difference, and I can happily buy kimchi sourced from anywhere without worrying about an unauthentic taste.

Of course, it is a shame that most exports of kimchi are not from the country of origin, because it is supposed to be the national dish. I can see why the 'traditionalists' are fighting hard to keep kimchi culture going in Korea, and not lose the market to the Chinese giants.

Kimchi | Svelte Salivations

I went to my local Chinese (!) grocery store, and they only sell one brand of kimchi - Chongga. This is actually a product of Korea, and a bit of Googling research led me to understand that it is a massive South Korean company. 

Yay for supporting Korean kimchi! ;)

My usual kimchi-related dishes are kimchi fried rice, kimchi noodles and kimchi pancake. Which are all delicious, but I wanted to try something different.

Fluffy white rice | Svelte Salivations

Apparently there is a new food craze across the pond in New York [citation needed] involving ramen and burgers. While I haven't tried or seen that yet, I've met the rice burger. This was very popular in Hong Kong a few years back, I think due to a Japanese trend? It was even available in Hong Kong McDonald's!

Makiko Itoh at Just Bento and Sonia at Nasi Lemak Lover both show you how to make a rice burger, but recommend you use Japanese short grain rice. I don't have short grain rice at home, and it is relatively more expensive to buy it, so I've attempted (and succeeded!) to make it with Thai long grain Jasmine rice.

Forming rice patties for rice burger | Svelte Salivations

I think the key was to mild it while it was still warm, press it down gently but firmly - really pack it in! - and then to chill it afterwards.

Vegetarian Kimchi Rice Burger | Svelte Salivations

I boost the amount of kimchi filling and give it a bit more substance, I fried some sliced onions and zucchinis with the kimchi. There's room for variation here, add whatever vegetables you've got at home instead - capsicum (or peppers if that's what you call them), carrots, potatoes, leeks...

Or even, for all you people out there who can't survived without meat, add some sliced beef / pork / chicken! It's a burger, fill it with whatever you want!

Just keep the kimchi. That's a must.

Vegetarian Kimchi Rice Burger | Svelte Salivations

Oh, and a runny egg.

It is divine!

Do note though, it isn't the easiest thing to eat. I mean, even normal burgers create a mess, so this one's just the same. Or maybe messier. ;)

Vegetarian Kimchi Rice Burger | Svelte Salivations

Enjoy! And lemme know what you think!

Full recipe-->

Saturday, 22 March 2014

Creamy Leek and Potato Seafood Chowder

Chunky Leek and Potato Seafood Chowder | Svelte Salivations

I got woken up early this Saturday morning by a parcel delivery. My bell makes a really loud angry buzz noise, and it startles me every time. It also makes me think that the person at the door is angry and impatient (but they're always just lovely, well mostly...), so I scramble to the door phone as fast as I can every time.

I'm in an upstairs flat in a building without lifts, so I feel bad for making the post man / courier man / delivery man walk all the way up just to give me my stuff. This means that I gotta go all the way down to get it.

In mah PJs.
Half asleep.
With real (non-sexy) bed hair.

So after the excursion down to the front of the building (with me running down because I worry that if I make them wait, they'll leave) and then back up again, I'm wide awake.

What do you do when you're up early on a weekend? 

I decided to head down to the local market, which I don't get to do during the weekdays. After walking around a couple of fruit and vegetable stores, and deciding that nothing was terribly exciting (as in exotic or at least uncommon), I picked up some cheap and fresh deals instead.

What caught my eye were some beautiful bright green firm leeks. I haven't had leek in a while, but it's one of my favourite vegetables. Inspired by the wintry gusts of wind this morning, I picked up some more winter vegetables (isn't it supposed to be spring already!?) to make a soup. Or a chowder, as it were. A seafood chowder, with fish and crabmeat.

Chopped winter vegetables for chowder | Svelte Salivations

While I love a good leek and potato soup on its own, I find adding some fish gives it another dimension. The only problem is that it significantly increases the price of this dish... #studentmoneyproblems

I popped into Tesco to have a look anyway, and found some kippers for £1.15 - i.e. £6.49 a kilo! Kippers are smoked fish (similar to smoked mackerel I think) but need to be cooked again before eating.

Kippers poached in milk | Svelte Salivations

The instructions on the packet say to boil them in the bag in boiling water for 15 minutes. I adjusted this in order to get maximum flavour out of the kipper into the chowder: I poached them out of the bag in some milk, and then reserved the milk for the chowder. My kippers also came with a knob of butter, which I chucked in as well, but that's probably optional. The smell of this cooking was incredible - smoky and fishy, but in the best way.

The rest of the chowder is pretty straight forward. The hardest part, to me, is the chopping. You gotta slice up the leeks (and wash them thoroughly to get all the sand out) into discs, dice the onion, and peel and cube the potatoes and carrots.

Then it'll all go into a pot and cook.

Pot of vegetables for chowder | Svelte Salivations

It looks like quite a lot here, and it is! The higher your vegetables to liquid ratio, the thicker, creamier, or chunkier your chowder will be.

There's not much to it after this. Just add stock, mash / blend (or don't), add your kipper infused smoky milk, and stir in your kipper bits.

As an added bonus, I added in a can of crabmeat. Because it's not really seafood chowder if you've only got fish - it's fish chowder.

Creamy Leek and Potato Seafood Chowder

I love crab, and canned crabmeat is a far cry from the real deal, but it's affordable, and convenient, so I use it. It's no good for dishes where crabmeat is supposed to the star, but in this chowder, it works brilliantly. You're not relying on the crabmeat for flavour, but texture, as it makes the chowder nice and thick and chunky, and really adds to it feeling like a filling meal (especially if you've blitzed the ritz out of the vegetables!)

This winter soup will warm you from the inside ;)

Full recipe -->

Sunday, 16 March 2014

Salted Caramel Mud Cake with Caramel Spikes

I can't remember where and when I first tried salted caramel. All I remember, was that it was everywhere, in everything, and I loved it.

I would hunt out salted caramel cupcakes (obvious choice), salted caramel cookies, salted caramel brownies, salted caramel macarons, salted caramel ice cream... Not that they really needed hunting out, because lucky for me, everyone else seemed to be obsessed with them too =)

Salted Caramel Mud Cake | Svelte Salivations

It was a while though, before I attempted making anything with salted caramel. I was very intimidated by the idea of having to make the caramel myself. It seems like ready made caramel in a tin or that dulce de leche stuff I keep hearing about is not ready available here in the UK.

The first salted caramel food item I made was a chocolate cookie filled with salted caramel. I cheated and just bought hard chewy caramels to wrap in the middle. While it worked (and was delicious!) they were very chewy once cooled. So I set out to make my own salted caramel sauce for the next recipe: salted caramel cheesecake.

It definitely wasn't as hard as I had imagined to make caramel, so I decided to hone my skills with a salted caramel cake.

Salted Caramel Mud Cake | Svelte Salivations

Mud cake is by far my favourite kind of cake. I love the dense, moist, rich texture of the cake. It lends itself perfectly to quality chocolate cakes, but I thought it would be amazing with caramel too. I decided to go with these recipes from Taste.com.au and from Belinda at The Moonblush Baker.

Ingredients for Salted Caramel Mud Cake | Svelte Salivations

It requires some melting of the wet ingredients first, so this is a recipe that takes just a bit longer of your time. Time that's definitely worth spending though!

I usually use very cheap normal chocolate when I bake (in recipes that call for chocolate rather than cocoa powder) because I find that once everything is mixed together, it makes very little difference. However, I spotted this beautifully packaged Tesco finest* Cook's White Cooking Chocolate, and was  persuaded to give it a go. Made with cocoa butter from Ghana and Ivory Coast, and vanilla from Madagascar, this looked like the real deal!

Tesco finest* Cook's White Cooking Chocolate

With everything butter, sugar, white chocolate, golden syrup, vanilla bean paste in a pan, pour over some hot milk and heat gently over a low heat. Keep stirring until it's melted and smooth, making sure nothing sticks to the bottom and burns.

You'll want to set that aside until it cools completely to room temperature.

In the meantime, try not to drink all of it!

Ingredients for Salted Caramel Mud Cake | Svelte Salivations

Then, beat in your eggs one at a time, and mix with the sifted dry ingredients. I baked mine in a 20cm round springform pan lined with baking paper.

I find mud cakes turn out best when cooked at slightly lower temperatures than normal and for longer, so I baked mine at 150˚C for 45 minutes. When you test this cake, you're aiming for just undercooked, rather than overcooked, so test at about 40 minutes, and take it out when there's still a smidgeon of cake crumbs sticking to your cake testing instrument of choice.

Let it cool for a bit in the pan (that will finish off the cooking process) for 15-20 minutes, and then turn it out to cool on a wire tray. Now you have to let it cool completely before cutting into it.

Salted Caramel Mud Cake | Svelte Salivations

I cut mine in half so I could fill with icing and caramel sauce.

If you want to cut down on the filling (which is very sweet, in the best way) then just level off your cake, and do one layer. But if you want the full experience, then getting layers and layers of salted caramel buttercream and salted caramel sauce in is the way to go. YOLO, right? ;)

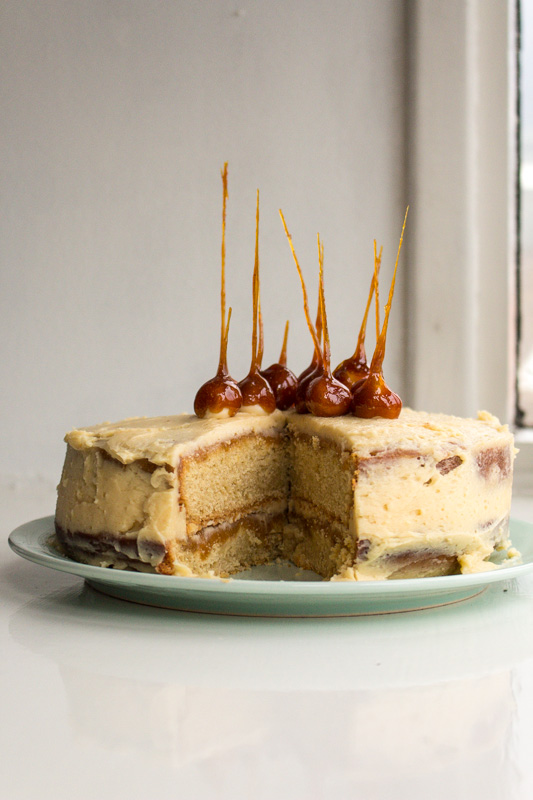
Salted Caramel Mud Cake with Caramel Spikes | Svelte Salivations

The caramel sauce is made by heating up some sugar, and letting it melt and cook and turn a beautiful dark amber brown colour. Then add some heavy cream to stop it cooking and to thin it to your desired consistency. I recommend something thicker, so it is easier to spread a generous layer on your cake. Salt to taste. 

Then using the rest of the sauce is incorporated into buttercream icing that is all ready to go. Use that the stick the layers together and to cover the surface of the cake. 

Salted Caramel Mud Cake with Caramel Spikes | Svelte Salivations

Don't the layers look amazing? If you pour over the caramel sauce when it's just warm, over the cut surface of the cake, it gently seeps in, enriching your cake and making it seem like it's oozing caramel!

I also added caramelised spikes for a finishing touch. It's inspired by these Caramel-Dipped Hazelnuts by Martha Stewart, but instead of using that recipe, I just dipped these in the caramelised sugar I made for the sauce, but before I added in heavy cream.

Caramel Spikes | Svelte Salivations

Just take the pan off the heat when all the sugar is melted and use the caramel then. If it starts to get too thick, then put the pan back on a low heat, much lower than you were using to cook the sugar. This is so the sugar heats up and becomes runny enough to use again, but doesn't continue to cook and risk getting burnt.

I didn't have hazelnuts, so I used some round Peko milk caramels I had.

Peko milk caramels | Svelte Salivations

Just stick a toothpick in them or anything round and of a similar size, and carefully dip into the melted caramel sugar.

BE CAREFUL. The caramel is incredibly hot so take a lot of care to not burn yourself!

Then lift it up gently and let the drips of caramel dry mid air. When it is set in place, you can place it down and do the next one.

Decorate as you wish!


Salted Caramel Mud Cake with Caramel Spikes | Svelte Salivations

SALTED CARAMEL MUD CAKE WITH CARAMEL SPIKES by
Salted caramel. Mud cake. Need I say more?

Makes 1 cake with 12 slices. Bakes in 45 minutes, but you'll a couple extra hours to prep and assemble.

What you need:

  • 200g butter
  • 200g white chocolate
  • 150g light soft brown sugar
  • 1 tablespoon golden syrup
  • 1 teaspoon vanilla bean paste
  • 150mL warm milk
  • 2 eggs
  • 150g plain flour
  • 150g self-raising flour
  • 1 teaspoon salt
First do this:
  1. Preheat oven to 150˚C fan forced (170˚C normal) and line your cake tin with baking paper. I used a 20cm springform tin.
  2. Place butter, white chocolate, sugar, golden syrup and vanilla in a pan. Pour over the warmed milk, and melt everything over a gentle heat. Keep stirring to make sure nothing gets stuck to the bottom of the pan and burns. Once it is all melted and smooth, take off the heat and allow to cool to room temperature.
  3. When the mixture is cooled, add one egg to the mixture, beating really well, then add the next, beating well again.
  4. In a large bowl, sift in the flours and salt. Create a well in the middle of the dry ingredients, and pour in some of your wet mixture. Using a whisk, stir the wet mixture in a small circle, bringing in flour a little at a time. Keep adding the wet mixture into the well a little at a time, to ensure easy lumpless mixing, until it is all combined.
  5. Pour the cake batter into your prepared tin and bake for 45 minutes. Aim for just undercooked, so take the cake out of the oven when you still have a few moist crumbs on your cake tester. 
  6. Let the cake sit in the tin for 15 minutes, before turning it out to cool on a wire rack.
Then you need to make some caramel, for the spikes, the caramel sauce and the buttercream. So grab:
  • 200g sugar (any type - granulated or caster, brown or white - shouldn't matter)
  • 12 round milk caramels, hazelnuts, anything of that size/shape (maltesers?) to act as foundations for the caramel spikes
  • 150mL heavy cream (but you may use 100-200mL)
  • sea salt to taste
  • 100g butter, softened to room temperature
  • 200g icing sugar
Then you can do this:
  1. Bring the heavy cream out to sit on the kitchen counter. This is allow it to come closer to warm temperature while you melt the sugar.
  2. Dump all the sugar into a tallish pan (for safety reasons!) and gently swirl it around so it forms a even layer. Start on a very low heat for 2-3 minutes, then up the heat to low for another 2-3 minutes, then up to medium low. The point of this is to slowly bring the pan up to a medium low heat, so there aren't any hot spots on the bottom of the pan. Don't touch the sugar at all, and wait for it to melt. This can take 10 minutes or so. When you start to see it liquefying, still don't touch the sugar! At a low heat, the sugar won't burn quickly, so you can leave it to work itself, as fiddling can cause recrystallisation. When the entire bottom layer has liquefied, then you can softly swirl the pan to allow the top layer to contact heat. Or, with as few strokes as possible, use a wooden spoon to pour the liquid sugar over the unmelted sugar.
  3. While waiting for this, stick some skewers or toothpicks into your round spike foundations. 
  4. When all the sugar is melted into liquid, stir constantly until it turns amber brown. Stirring now is important to prevent burning.
  5. Once the colour is darkened (but before burnt!) take it off the heat. Time to make the caramel spikes: With your thing-on-a-stick, hold the empty end and carefully dip and swirl the round end into the caramel so it gets coated. Lift gently out of the caramel, and let the drips cool mid-air. I find gently blowing onto the caramel stream can help. Once set, you can rest it down and do the next one. If the caramel gets too hard at any point, just return it to a very low heat to rewarm, but not to carry on cooking.
  6. When you're finished with the caramel spikes, we can then make the caramel sauce: Make sure the caramel is nice and runny, put the pan on a very low heat if necessary, then remove from heat and pour half the heavy cream. Beware of spluttering of the caramel, so take extra precautions! Keep stirring all the way throughout. Stir, stir, stir! If any of the caramel lumps up, try stirring for a few minutes to see if it melts back down, otherwise return to a low heat and stir over that. Depending on how thick it looks, keep adding more to thin it out. I used 150mL in total, but it will depend on personal preference. Then add some sea salt to taste. The caramel sauce is done, just let it cool now!
  7. Finally, we can whip up the buttercream: With the butter softened at room temperature, beat it (preferably with a machine) for a few minutes to get it nice and soft and fluffy.
  8. Sift in the icing sugar a bit at a time (add too much and the icing sugar will puff back up into your face!) and beating it all in.
  9. Drizzle in the cooled caramel sauce (make sure it is cooled!) and then beat to mix. It should be beaten to a light consistency that holds its shape. If needed, milk or heavy cream can be added to lighten it up.
With all this done, you can then assemble it together:
  1. Cut your cooled cake in half horizontally. If it's a bit domed on top, just flip it upside down to get a flat surface and make full use of your cake.
  2. Spread over a layer of caramel sauce onto the top of each half. This works best when the caramel is still a little bit warm, and if you spread it onto the cut surface, because then the cake will absorb some of that sauce.
  3. Spread a layer of buttercream over the bottom half (when the caramel sauce is cooled) and then place the top half on and frost the sides and the top of the cake as well.
  4. Stand the spikes into the middle of the cake, round end down, or however else you wish!