Showing posts with label dessert. Show all posts

Tuesday, 19 August 2014

Fresh Mint Stracciatella Ice Cream with Chocolate Leaves - Without an Ice Cream Machine!

I've added a fourth meal to my days: ice cream. Yes, ice cream as a meal. Can be eaten at any time, though usually between lunch and dinner, or after dinner. Or both.

The days are so hot now that I feel like air-conditioning or going to the pool or wearing nothing wearing less is just not doing anything to cool me down. Ice cream, though, seems to do the trick. ;)

Fresh mint leaves | Svelte Salivations

So when our neighbour kindly gave us some home-grown fresh mint leaves, I decided to make some fresh mint ice cream, with dark chocolate strewn throughout!

Only, I don't have an ice cream machine! I've been longing for one for ages, but it's not an investment I'm able to make currently, so I read up on ice cream making without a machine. And as with everything, there's loads of advice out there on the internet about how to go about doing so! This post from The Kitchn summarises much of the information out there.

Fresh Mint Stracciatella Ice Cream with chocolate leaves | Svelte Salivations

I think the mint leaves I have here a spearmint leaves. They smelt amazing and were so herby and fresh, so unlike the artificial in-your-face mint flavour that gum / toothpaste / cheap ice cream has. 

To get the most out of the flavour, I blitzed them up with some milk in a blender until the pieces were extremely fine. This turned the milk a funny yellow green colour at first, but then when I heated it up with the rest of the milk and cream, the colour developed into a beautiful pastel mint! Natural food colouring! I then let it sit in the hot milk/cream mixture until cooled - a bit like steeping tea, trying to slowly and delicately draw the flavour out. 

Fresh Mint Stracciatella Ice Cream with chocolate leaves | Svelte Salivations

I chose this method found on The Kitchn to make my ice cream, with a bit of modification to suit my needs. It's instructions on how to freeze and churn the ice cream, rather than the ice cream mixture itself. The method basically involves using an electric mixer to smash out any ice crystals that form between bouts in the freezer, and also 'churning' the mix while freezing (as the mixture bowl is nestled in ice).

The results were not bad - my ice cream didn't turn out creamy and smooth, but it was definitely scoopable and not a solid block of ice! Though part of this may be to do with my choice of a lower-fat recipe, I think this method of making ice cream without a machine may not be suitable for a hot place like Hong Kong. 

As soon as I took the ice cream mixture out of the freezer to mix and churn, it started to melt again, even though I made a nice ice bath for it! It was like one step forward, two steps back... I struggled to get it to a soft serve consistency, and then when I did, it melted into liquid again as soon the electric mixer hit it!

Fresh Mint Stracciatella Ice Cream with chocolate leaves | Svelte Salivations

The resultant consistency was a compromise between ice cream and sorbet. There ice crystals in it, but only very fine crystals that actually contribute to the unbelievably cool minty freshness that this ice cream is. 

Fresh Mint Stracciatella Ice Cream with chocolate leaves | Svelte Salivations

I drizzled melted chocolate during the last churning to make stracciatella, because nothing goes better with mint than dark bittersweet chocolate

Then with the last bits of leftover melted chocolate, I painted over the back of some mint leaves to make intricate chocolate leaves. Decoration that's edible, is the best type of decoration!

Fresh Mint Stracciatella Ice Cream with chocolate leaves | Svelte Salivations

Try out this fresh minty ice cream to cool you down this summer, and let me know what you think. It's definitely worth the effort. Alternatively, you could chuck a bucket of ice over your head (#ALSIceBucketChallenge, anyone?)!

Full recipe -->

Thursday, 24 July 2014

Watermelon and Mango Ice Blocks


How hot does it get in summer where you live? It's been hovering around 32˚C in Hong Kong these few weeks and the humidity only makes it seem hotter.

Ice cream and ice cold drinks are staples of the summer diet, but it's hard to enjoy these treats while maintaining that summer bod you've worked so hard for!


These ice blocks are delicious and healthy, perfect for these hot summer days. All you need is some fresh fruit, which should be abundance at this time of the year! Watermelon and mango is actually a combination I've fallen in love with after trying this flavour combination in a drink.


The watermelon is refreshingly crisp, while the mango is sweet and fragrant. I used Thai mangoes for this, which are yellow and shaped like a leaf. I prefer the mangoness of these compared to the greeny-red round ones. I also added some lime juice to the mangoes just to cut through the richness a little.


Try out these delicious fruity treats and let me know what you think!

Full recipe here --->

Sunday, 16 March 2014

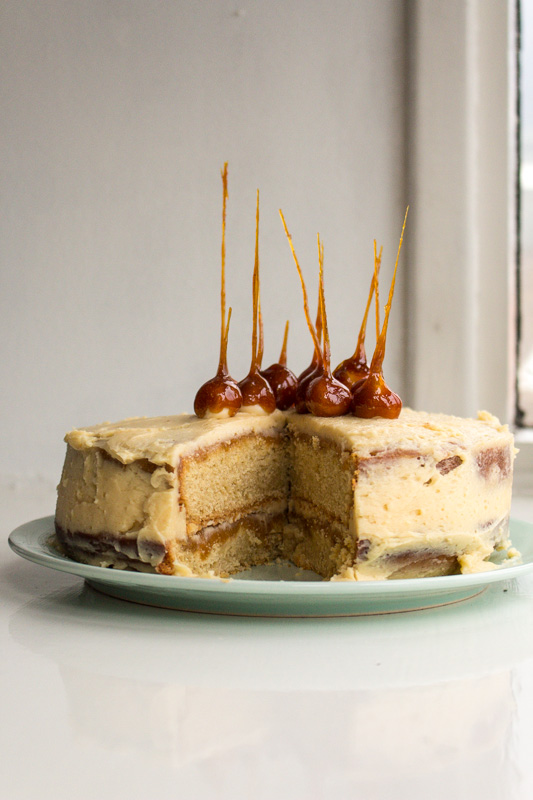
Salted Caramel Mud Cake with Caramel Spikes

I can't remember where and when I first tried salted caramel. All I remember, was that it was everywhere, in everything, and I loved it.

I would hunt out salted caramel cupcakes (obvious choice), salted caramel cookies, salted caramel brownies, salted caramel macarons, salted caramel ice cream... Not that they really needed hunting out, because lucky for me, everyone else seemed to be obsessed with them too =)

Salted Caramel Mud Cake | Svelte Salivations

It was a while though, before I attempted making anything with salted caramel. I was very intimidated by the idea of having to make the caramel myself. It seems like ready made caramel in a tin or that dulce de leche stuff I keep hearing about is not ready available here in the UK.

The first salted caramel food item I made was a chocolate cookie filled with salted caramel. I cheated and just bought hard chewy caramels to wrap in the middle. While it worked (and was delicious!) they were very chewy once cooled. So I set out to make my own salted caramel sauce for the next recipe: salted caramel cheesecake.

It definitely wasn't as hard as I had imagined to make caramel, so I decided to hone my skills with a salted caramel cake.

Salted Caramel Mud Cake | Svelte Salivations

Mud cake is by far my favourite kind of cake. I love the dense, moist, rich texture of the cake. It lends itself perfectly to quality chocolate cakes, but I thought it would be amazing with caramel too. I decided to go with these recipes from Taste.com.au and from Belinda at The Moonblush Baker.

Ingredients for Salted Caramel Mud Cake | Svelte Salivations

It requires some melting of the wet ingredients first, so this is a recipe that takes just a bit longer of your time. Time that's definitely worth spending though!

I usually use very cheap normal chocolate when I bake (in recipes that call for chocolate rather than cocoa powder) because I find that once everything is mixed together, it makes very little difference. However, I spotted this beautifully packaged Tesco finest* Cook's White Cooking Chocolate, and was  persuaded to give it a go. Made with cocoa butter from Ghana and Ivory Coast, and vanilla from Madagascar, this looked like the real deal!

Tesco finest* Cook's White Cooking Chocolate

With everything butter, sugar, white chocolate, golden syrup, vanilla bean paste in a pan, pour over some hot milk and heat gently over a low heat. Keep stirring until it's melted and smooth, making sure nothing sticks to the bottom and burns.

You'll want to set that aside until it cools completely to room temperature.

In the meantime, try not to drink all of it!

Ingredients for Salted Caramel Mud Cake | Svelte Salivations

Then, beat in your eggs one at a time, and mix with the sifted dry ingredients. I baked mine in a 20cm round springform pan lined with baking paper.

I find mud cakes turn out best when cooked at slightly lower temperatures than normal and for longer, so I baked mine at 150˚C for 45 minutes. When you test this cake, you're aiming for just undercooked, rather than overcooked, so test at about 40 minutes, and take it out when there's still a smidgeon of cake crumbs sticking to your cake testing instrument of choice.

Let it cool for a bit in the pan (that will finish off the cooking process) for 15-20 minutes, and then turn it out to cool on a wire tray. Now you have to let it cool completely before cutting into it.

Salted Caramel Mud Cake | Svelte Salivations

I cut mine in half so I could fill with icing and caramel sauce.

If you want to cut down on the filling (which is very sweet, in the best way) then just level off your cake, and do one layer. But if you want the full experience, then getting layers and layers of salted caramel buttercream and salted caramel sauce in is the way to go. YOLO, right? ;)

Salted Caramel Mud Cake with Caramel Spikes | Svelte Salivations

The caramel sauce is made by heating up some sugar, and letting it melt and cook and turn a beautiful dark amber brown colour. Then add some heavy cream to stop it cooking and to thin it to your desired consistency. I recommend something thicker, so it is easier to spread a generous layer on your cake. Salt to taste. 

Then using the rest of the sauce is incorporated into buttercream icing that is all ready to go. Use that the stick the layers together and to cover the surface of the cake. 

Salted Caramel Mud Cake with Caramel Spikes | Svelte Salivations

Don't the layers look amazing? If you pour over the caramel sauce when it's just warm, over the cut surface of the cake, it gently seeps in, enriching your cake and making it seem like it's oozing caramel!

I also added caramelised spikes for a finishing touch. It's inspired by these Caramel-Dipped Hazelnuts by Martha Stewart, but instead of using that recipe, I just dipped these in the caramelised sugar I made for the sauce, but before I added in heavy cream.

Caramel Spikes | Svelte Salivations

Just take the pan off the heat when all the sugar is melted and use the caramel then. If it starts to get too thick, then put the pan back on a low heat, much lower than you were using to cook the sugar. This is so the sugar heats up and becomes runny enough to use again, but doesn't continue to cook and risk getting burnt.

I didn't have hazelnuts, so I used some round Peko milk caramels I had.

Peko milk caramels | Svelte Salivations

Just stick a toothpick in them or anything round and of a similar size, and carefully dip into the melted caramel sugar.

BE CAREFUL. The caramel is incredibly hot so take a lot of care to not burn yourself!

Then lift it up gently and let the drips of caramel dry mid air. When it is set in place, you can place it down and do the next one.

Decorate as you wish!


Salted Caramel Mud Cake with Caramel Spikes | Svelte Salivations

SALTED CARAMEL MUD CAKE WITH CARAMEL SPIKES by
Salted caramel. Mud cake. Need I say more?

Makes 1 cake with 12 slices. Bakes in 45 minutes, but you'll a couple extra hours to prep and assemble.

What you need:

  • 200g butter
  • 200g white chocolate
  • 150g light soft brown sugar
  • 1 tablespoon golden syrup
  • 1 teaspoon vanilla bean paste
  • 150mL warm milk
  • 2 eggs
  • 150g plain flour
  • 150g self-raising flour
  • 1 teaspoon salt
First do this:
  1. Preheat oven to 150˚C fan forced (170˚C normal) and line your cake tin with baking paper. I used a 20cm springform tin.
  2. Place butter, white chocolate, sugar, golden syrup and vanilla in a pan. Pour over the warmed milk, and melt everything over a gentle heat. Keep stirring to make sure nothing gets stuck to the bottom of the pan and burns. Once it is all melted and smooth, take off the heat and allow to cool to room temperature.
  3. When the mixture is cooled, add one egg to the mixture, beating really well, then add the next, beating well again.
  4. In a large bowl, sift in the flours and salt. Create a well in the middle of the dry ingredients, and pour in some of your wet mixture. Using a whisk, stir the wet mixture in a small circle, bringing in flour a little at a time. Keep adding the wet mixture into the well a little at a time, to ensure easy lumpless mixing, until it is all combined.
  5. Pour the cake batter into your prepared tin and bake for 45 minutes. Aim for just undercooked, so take the cake out of the oven when you still have a few moist crumbs on your cake tester. 
  6. Let the cake sit in the tin for 15 minutes, before turning it out to cool on a wire rack.
Then you need to make some caramel, for the spikes, the caramel sauce and the buttercream. So grab:
  • 200g sugar (any type - granulated or caster, brown or white - shouldn't matter)
  • 12 round milk caramels, hazelnuts, anything of that size/shape (maltesers?) to act as foundations for the caramel spikes
  • 150mL heavy cream (but you may use 100-200mL)
  • sea salt to taste
  • 100g butter, softened to room temperature
  • 200g icing sugar
Then you can do this:
  1. Bring the heavy cream out to sit on the kitchen counter. This is allow it to come closer to warm temperature while you melt the sugar.
  2. Dump all the sugar into a tallish pan (for safety reasons!) and gently swirl it around so it forms a even layer. Start on a very low heat for 2-3 minutes, then up the heat to low for another 2-3 minutes, then up to medium low. The point of this is to slowly bring the pan up to a medium low heat, so there aren't any hot spots on the bottom of the pan. Don't touch the sugar at all, and wait for it to melt. This can take 10 minutes or so. When you start to see it liquefying, still don't touch the sugar! At a low heat, the sugar won't burn quickly, so you can leave it to work itself, as fiddling can cause recrystallisation. When the entire bottom layer has liquefied, then you can softly swirl the pan to allow the top layer to contact heat. Or, with as few strokes as possible, use a wooden spoon to pour the liquid sugar over the unmelted sugar.
  3. While waiting for this, stick some skewers or toothpicks into your round spike foundations. 
  4. When all the sugar is melted into liquid, stir constantly until it turns amber brown. Stirring now is important to prevent burning.
  5. Once the colour is darkened (but before burnt!) take it off the heat. Time to make the caramel spikes: With your thing-on-a-stick, hold the empty end and carefully dip and swirl the round end into the caramel so it gets coated. Lift gently out of the caramel, and let the drips cool mid-air. I find gently blowing onto the caramel stream can help. Once set, you can rest it down and do the next one. If the caramel gets too hard at any point, just return it to a very low heat to rewarm, but not to carry on cooking.
  6. When you're finished with the caramel spikes, we can then make the caramel sauce: Make sure the caramel is nice and runny, put the pan on a very low heat if necessary, then remove from heat and pour half the heavy cream. Beware of spluttering of the caramel, so take extra precautions! Keep stirring all the way throughout. Stir, stir, stir! If any of the caramel lumps up, try stirring for a few minutes to see if it melts back down, otherwise return to a low heat and stir over that. Depending on how thick it looks, keep adding more to thin it out. I used 150mL in total, but it will depend on personal preference. Then add some sea salt to taste. The caramel sauce is done, just let it cool now!
  7. Finally, we can whip up the buttercream: With the butter softened at room temperature, beat it (preferably with a machine) for a few minutes to get it nice and soft and fluffy.
  8. Sift in the icing sugar a bit at a time (add too much and the icing sugar will puff back up into your face!) and beating it all in.
  9. Drizzle in the cooled caramel sauce (make sure it is cooled!) and then beat to mix. It should be beaten to a light consistency that holds its shape. If needed, milk or heavy cream can be added to lighten it up.
With all this done, you can then assemble it together:
  1. Cut your cooled cake in half horizontally. If it's a bit domed on top, just flip it upside down to get a flat surface and make full use of your cake.
  2. Spread over a layer of caramel sauce onto the top of each half. This works best when the caramel is still a little bit warm, and if you spread it onto the cut surface, because then the cake will absorb some of that sauce.
  3. Spread a layer of buttercream over the bottom half (when the caramel sauce is cooled) and then place the top half on and frost the sides and the top of the cake as well.
  4. Stand the spikes into the middle of the cake, round end down, or however else you wish!

Monday, 3 March 2014

Champagne poached pears

Do you ever have an unfinished bottle of a champagne lying round that you're not sure what to do with?

No, I didn't think so. I don't know how we managed NOT to finish a bottle of champagne. I really don't. It's very odd. But we did.

I had not idea what to do with it. I mean, it's good champagne, but even good champagne isn't so good the next day. But not bad enough to throw it away. Do you know what I mean? No, probably not, because no one doesn't finish champagne...

So the internet came to the rescue, and I realised that people have (for unknown reasons, still) found half bottles of champagne lying round and they seem to like to put it to good use in the form of champagne poached pears.

Champagne poached pears | Svelte Salivations

I didn't really have a recipe to follow, but I just took inspiration from this, this, this and this.

I don't even know what variety of pears these are. I just found them for cheap (£1 a bag of like 6 or more) at the local market. They weren't too soft and held their shape quite well, which is the type of pears which are ideal.

Peeled whole pears for poaching | Svelte Salivations

I peeled them but left them whole, stems intact, just slicing their bottoms so they could stand upright. Unless you've already prepared your poaching liquid, and are going to poach them right away, it's better to leave them in some water so they don't brown.
 

My poaching liquid was the rest of the bottle of champagne (about 350mL), and then I topped this small but deep pot with water. I used 1/4 cup sugar, like the recipe from The Year In Food here, but all the others used about 1 cup (for the same amount of liquid) which I would imagine to be very sweet. 

I chose to infuse my syrup with cinnamon sticks, vanilla bean paste, and some clementines, just cut in half and gently squeezed to release some juice and flavour.

Vanilla bean paste, cinnamon and champagne for poaching pears | Svelte Salivations

Once the sugar has dissolved, bring the liquid just to boiling point, and then you can submerge the pears. Keep the liquid barely simmering

Poaching pears with clementines, cinnamon and vanilla | Svelte Salivations

You'll need enough liquid to cover the pears completely, so add some more water if you need. To make sure my pears remained submerged, I snipped a circle of parchment paper to fit the top of the pot and gently stuck it down. I cut a hole to let the steam through too.

Parchment paper to submerge pears while poaching | Svelte Salivations

These took 20 minutes or so, but it really depends on your pears. So just keep an eye on them. When done, it'll be easy to stick a toothpick through them, but they'll still be firm enough to hold their shape.

I made these before dinner and then just left them to cool in the pot, off the heat. When serving them, they were room temperature, and I just heated up the poaching liquid and poured it over to warm them a little.

Champagne poached pears | Svelte Salivations

They were really amazing and so easy to make! It's such an elegant dessert (champagne will do that to everything!) and so versatile too. I loved the spice of the cinnamon and vanilla, and the tartness of the clementines. 

If you like your desserts sweet (which I usually do) you can add more sugar to the poaching liquid, but I found 1/4 cup to be just right, as the pears themselves have a natural sweetness. You can infuse anything you like really, and I'm excited to try some other spices and flavours next time!